Sometimes the ache in my heart is ... too much!
Sometimes I miss you ... too much!
Sometimes my tears are ... too much!
Sometimes I need you ... too much!
Sometimes I want to scream and yell ... too much!
Sometimes the pain in my chest is ... too much!
Sometimes I ace for your touch ... too much!
Sometimes I hurt for you ... too much!
But my love for you will never be ... too much!
I will miss you always and I have learned that just because you died, I haven't stopped loving you!

These journeys are continually evolving ... I am Pagan, with a strong connection to the earth. I love making soap and growing vegetables.
To purchase my soap - http://www.dragonshomemadesoap.bigcartel.com
My soap page link - http://www.facebook.com/dragonshomemadesoap
Friday, 8 July 2011


Monday, 4 July 2011
Love in my vegie patch
I love dragonflies ... dragons flying! This day in my garden was really special. I think this photo was taken in late summer, early spring.

Sunday, 26 June 2011
Purple Carrot Juice
While my kids were staying I made them fresh vegie juice ... purple carrots, celery, carrot and ginger. The colour the purple carrots gave the juice was amazing! Plus the taste ... unreal!


My son Andy ... looks like he really enjoyed the fresh vegie juice ...


My son Andy ... looks like he really enjoyed the fresh vegie juice ...
Saturday, 25 June 2011
Friday, 24 June 2011
Some things should remain secret ...
February 2011
While my kids were visiting from Sydney we cleaned up an area that had a few pieces of timber stacked one on top of the other.
When we removed the last piece of timber ... there was a snake skin ... and ghee it was long! It was quite scary to realise a snake had been there, as this area is at the bottom of the steps Wilson and I use to get down to my vegie garden ... and we go down and up these steps at least twice a day during the week and more often during weekends. I wonder how close we got to Mr Snake? ... Did Wilson sense he was there? ... Where is Mr Snake staying for autumn/winter? ... Is it true that snakes are territorial and return to the same area year after year? ... What can I do to make sure we all remain safe when the weather gets warmer ... that includes Mr Snake?

Deep down I have this feeling of ... why didn't this remain a secret ... there are some things I'd rather not know about ... and this is one of those!


Saturday, 18 June 2011
Merv's second anniversary - 29 February 2011!
Where has time gone ... it's two years already and yet I seem to remember every detail as if it's still happening. A couple of the biggest things I've learned is that when a person dies you don't stop loving them ... and when your heart is breaking there is a real physical pain!
I think of Merv with every breath I take ... I miss him more than I thought was possible!
This year we decided to repeat letting the environmental friendly balloons go, with messages written on them for Merv. We chose colours for special reasons - Blue and Gold to represent Otago and Taieri. We lived in Otago on the Taieri plains and Merv played for the Taieri Hockey Club and represented Otago at all levels in hockey and coached both the Taieri Hockey Club and the Otago U21 Mens and Otago Senior Mens hockey teams. Next we chose black and silver for New Zealand ... for all top sports teams in New Zealand. Finally I chose purple, as Merv called me his Purple Dragon ... and I loved that name!


Amie and Andy came to stay
In February 2011 both Amie and Andy came to stay. It was lovely having them home with me and we did many fun things together.
![]()


We went to my favourite cafe in Strathalbyn ... Argus House!
This is their lentil, curry and kumara pie ... to die for!



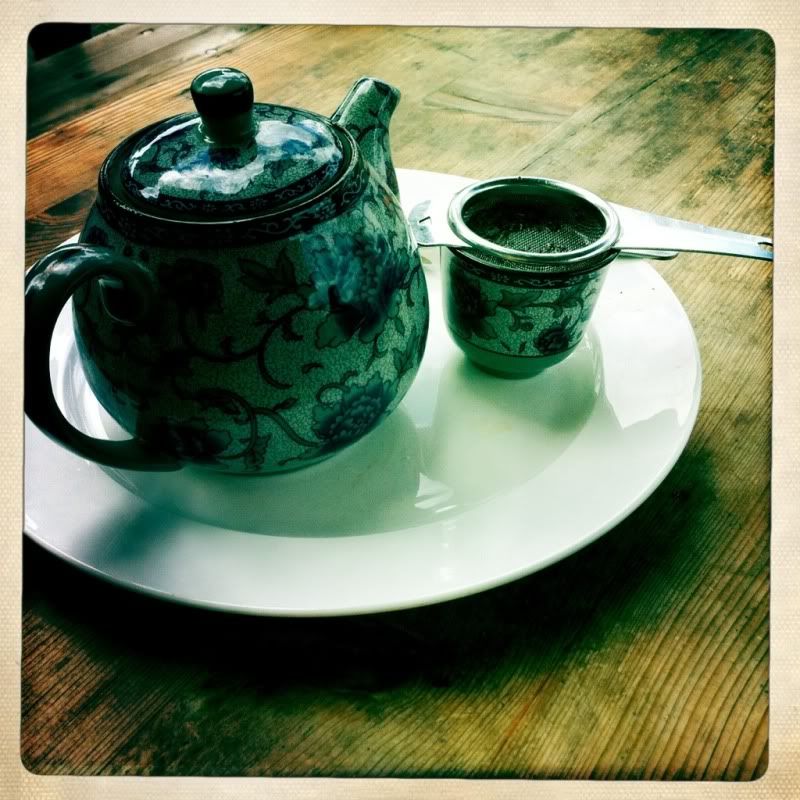

We went to my favourite cafe in Strathalbyn ... Argus House!
I love their chai and the way they serve it. It's spicy rather than sweet and you can see whole spices in the teapot ... divine!
This is their lentil, curry and kumara pie ... to die for!
Friday, 17 June 2011
Amie's T-Shit
 This was one of Merv's favourite songs, sung by one of his favourites - Dave Dobbyn.
We played this song at his farewell! What a great t-shirt!
Tuesday, 14 June 2011
Gift from those I work with

Moth Orchid
... the orchid my colleagues gave me when I returned from New Zealand was beautiful. It's continued to flower for four months. I'm hoping it will have a new flowering spike next season.
Farewell

My Dad
An emotional farewell to my precious Dad and it was time to head to Christchurch to catch a flight to Adelaide via Melbourne.
My Next Car ...

Sweet as ...
A drive to Dunedin to see some friends and family is never complete without a visit to the home of Speights.
South Island Beauty

Birth at Moeraki
While visiting my girlfriend we celebrated a birth. Such a beauty.
Sunday, 12 June 2011
Earthquake
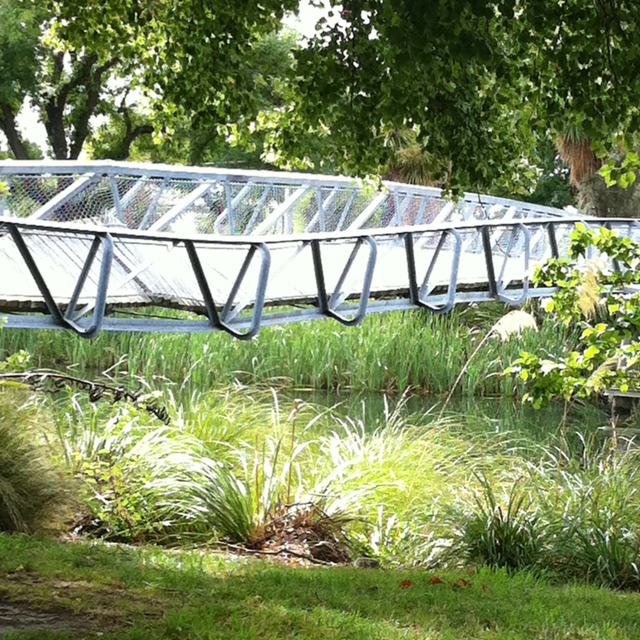
A foot bridge in Christchurch. Showing a little of what one of the big earthquakes has done.
While I was home, my girlfriend drove me to Christchurch. It was confronting.
A couple of days after I flew out of Christchurch, another huge aftershock hit and now the damage is much worse.
A couple of days after I flew out of Christchurch, another huge aftershock hit and now the damage is much worse.
Victoria Park, Waimate

Reflection in the park
The kids and I explored places we used to visit when we lived in New Zealand. a great way to appreciate things you have left behind.
Mum died while we were visiting

My sister-in-law, Karen, had been caring for both my parents and sitting with Mum for a few days when we arrived. ... And a few hours after getting to the nursing home, Mum passed.
Been absent and much has happened

Mum was dying so I took my kids home. Here they are standing at the corner of the street I used to live on. The main street of my little village is behind them. January 2011
Wednesday, 26 January 2011
Lemon Tea Soap
My seventh batch of soap was my first play using cosmetic colours approved for use with soap. I recently bought some mica from here, they're also used in mineral makeup.
I decided to use two essential oils - Lemon and Tea Tree ... and the smell is divine.
I put three heaped scoops of grape pop mica, lemon pop mica and red oxide into three plastic cups. I mixed the red oxide with a little water to make sure there were no lumps ... and I should have mixed the mica with a little oil ... so have made a note to do that next time. At light trace I added unscented soap to each of these cups and mixed them well. Then poured each one into a sauce bottle.
Next I added the EO to the main soap and stick blended. Here's were things happened quicker than I expected and I let the soap get to thick trace ... instead of pouring in to the mould at medium trace.
I squirted a few lines of the three colours on the base and sides of the moulds and then gently poured the soap in.
The soap was too thick, so when I started to make 'flower' patterns, the lightly traced coloured soap appeared to 'roll' off the bumps on top of the heavy trace soap. At this point I decided to change the plan and to make lines and patterns with the three colours.

I don't like this looks, but the smell is divine!

Unmoulded logs


Bars up close ... still don't like this look ... but am loving the smell!
I decided to use two essential oils - Lemon and Tea Tree ... and the smell is divine.
I put three heaped scoops of grape pop mica, lemon pop mica and red oxide into three plastic cups. I mixed the red oxide with a little water to make sure there were no lumps ... and I should have mixed the mica with a little oil ... so have made a note to do that next time. At light trace I added unscented soap to each of these cups and mixed them well. Then poured each one into a sauce bottle.
Next I added the EO to the main soap and stick blended. Here's were things happened quicker than I expected and I let the soap get to thick trace ... instead of pouring in to the mould at medium trace.
I squirted a few lines of the three colours on the base and sides of the moulds and then gently poured the soap in.
The soap was too thick, so when I started to make 'flower' patterns, the lightly traced coloured soap appeared to 'roll' off the bumps on top of the heavy trace soap. At this point I decided to change the plan and to make lines and patterns with the three colours.
I don't like this looks, but the smell is divine!
Unmoulded logs
Bars up close ... still don't like this look ... but am loving the smell!
Friday, 21 January 2011
Lavender Oats Soap
My sixth batch of soap was my first attempt at layers and I got the idea from a soap I'd seen shared by another member of Soap Making Forum.
I decided to use olive oil and coconut oil, lavender essential oil, pale blue clay to colour the bottom layer, oatbran to mix into the top layer and cocoa powder to sprinkle on top of the first layer, before putting the top layer on ... so there'd be an obvious line. I also chose to add some pearl mica to the top of one mould and to sprinkle some oatmeal on the top of the other mould ... just for something different.

I was careful adding the second layer, by pouring it gently over the back of a spatula, as I'd read this would help prevent the layers mixing. I was so curious during the 'gel' stage ... as I really wanted to see how the layers were working.

I was thrilled when I took the soap out of the moulds about 24 hours later.
I'd read a hint about cutting layered soap and soap with lines in it. Turn the soap on it's side and to cut the soap across the layers, so that you are less likely to affect the layered look. I'm thrilled with how the bars look.

I think I prefer the natual look of the oatbran sprinkled on top, although the pearl mica does have a soft glitter in the light.

The pale blue clay is good for all skin types ... especially mature skin and the oatbran will gently exfoliate the skin.

I love with how this soap looks!
I decided to use olive oil and coconut oil, lavender essential oil, pale blue clay to colour the bottom layer, oatbran to mix into the top layer and cocoa powder to sprinkle on top of the first layer, before putting the top layer on ... so there'd be an obvious line. I also chose to add some pearl mica to the top of one mould and to sprinkle some oatmeal on the top of the other mould ... just for something different.
I was careful adding the second layer, by pouring it gently over the back of a spatula, as I'd read this would help prevent the layers mixing. I was so curious during the 'gel' stage ... as I really wanted to see how the layers were working.
I was thrilled when I took the soap out of the moulds about 24 hours later.
I'd read a hint about cutting layered soap and soap with lines in it. Turn the soap on it's side and to cut the soap across the layers, so that you are less likely to affect the layered look. I'm thrilled with how the bars look.
I think I prefer the natual look of the oatbran sprinkled on top, although the pearl mica does have a soft glitter in the light.
The pale blue clay is good for all skin types ... especially mature skin and the oatbran will gently exfoliate the skin.
I love with how this soap looks!
Saturday, 15 January 2011
Nag Champa Soap
My fifth batch of soap was my first one for 2011. I was keen to get back to soapmaking after having spent a couple of weeks away on holiday ... plus I was keen to try the Nag Champa FO that I bought from Aussie Soap Supplies. Nag Champa is one of my all time favourite incense flavours.
This was the first time I trialled a recipe I 'made up'. I decided on this one, after more research and reading in a few places, that coconut oil should be no more than 20% of the total oils. I know opinions vary on this, but it was worth trying.

My Nag Champa soap is made of olive oil, rice bran oil and coconut oil. I added 33 gm of Nag Champa FO when the soap mix was 'light trace'. Then I removed about 200 gm and added 8 gm of black oxide (that I'd mixed with a little water) to that. I poured the soap into two silicon moulds, then poured half the 'black soap' down the centre of each. One I mixed it in the top half quite a bit, and the other I barely mixed ... just a few gently swirls.
I covered the moulds with cling and then wrapped them in towels.
24 hours later ... they're still quite soft and I couldn't unmould them due to feeling that my finger would go into the soap. It's hot and humid ... wonder if this is affecting the soaps ability to set.

48 hours later ... the soap is still soft, but I unmoulded it. I left the blocks sitting for a few hours then cut them. The cutting was a bit messy ... I think due to the soap still being too soft.

The smell and the look ... I love them both!
This was the first time I trialled a recipe I 'made up'. I decided on this one, after more research and reading in a few places, that coconut oil should be no more than 20% of the total oils. I know opinions vary on this, but it was worth trying.
My Nag Champa soap is made of olive oil, rice bran oil and coconut oil. I added 33 gm of Nag Champa FO when the soap mix was 'light trace'. Then I removed about 200 gm and added 8 gm of black oxide (that I'd mixed with a little water) to that. I poured the soap into two silicon moulds, then poured half the 'black soap' down the centre of each. One I mixed it in the top half quite a bit, and the other I barely mixed ... just a few gently swirls.
I covered the moulds with cling and then wrapped them in towels.
24 hours later ... they're still quite soft and I couldn't unmould them due to feeling that my finger would go into the soap. It's hot and humid ... wonder if this is affecting the soaps ability to set.
48 hours later ... the soap is still soft, but I unmoulded it. I left the blocks sitting for a few hours then cut them. The cutting was a bit messy ... I think due to the soap still being too soft.
The smell and the look ... I love them both!
Wednesday, 12 January 2011
Soapmaking - some things I've learned
Trace
Trace is when there is a 'trace (memory)' of the soap left showing, after some of the mix has been dripped from the mixer ... or you can see a 'drag' mark as the mixer is moved through the soap mix. A light trace is when this is barely visable ... a medium trace is when you can see it clearly but the mix will still pour easily ... and a thick trace is when the soap mix is almost peaking like a meringe mix. I personally have found that if I go to thick trace ... there's a chance the mix won't be so good when I have to spoon it into the moulds ... but it can be done. Thick trace sometimes happens by accident ... an accident known as 'seizing'. This is when you add something, like essential and/or fragrance oils, and the mixtures turns from a light pudding type mix to concrete is a second. It's scary ... but if you can manage to beat this a little to mix whatever it was you were adding, spoon it into moulds, smooth it out, wrap it well ... and hopefully the next day it won't look so bad. Sometimes you may have to toss this mix ... especially if the lye hasn't mixed properly. By checking the ph, you can tell if the lye has mixed properly ... soap when cured should have a ph of 9 or less. If you use your tongue to do the 'zap' test ... 9 or less will result in no zap!
Trace can happen very quickly ... in less than a minute ... or it can take many minutes. Relax and try not to stress ... although be confident you will for the first few batches you make.
After adding the lye mix to the oil mix, mix with a had beater for a minute or two, then stir for a minute or two ... now check if getting to a light trace. If it is ... now might be the time to add your oils (essential and/or fragrance). Light trace is often a good time to remove some soap to add colours. Soap is easy to play with at a light trace, but remember it can become thick very quickly when things are added, or it might still require quite a bit of mixing ... this is dependent on what you're adding and using ... and the temp you mixed at ... and the temp of the day ... so best to relax and work out these things as you go along.
Some people add the essential and/or fragrance oils to the oils before the lye mix is added ... others add them at light trace ... others at medium trace ... and some when the soap mix is a thick trace. What you decide to do, will depend on what you experience ... so keep making soap to you're happy with what you're doing ... and then enjoy it ever more.
Moulds
Make sure your moulds are wrapped up well with towels and/or rugs, after you've put the soap mix in them ... the soap needs a few hours to gel and during that time it gets quite warm (this is the lye working on the oils and making soap ... so make sure the moulds ar on something that won't be damaged by heat. I use a oven rack and have the towels going under the rack, up and over the moulds and tuck in the sides to prevent any draughts. Be careful not to move the moulds, so that the mix moves and sets unbalanced.
Cover the moulds with cling wrap ... before wrapping towels around them. This helps keep the heat in.
Make sure your moulds are wrapped up well with towels and/or rugs, after you've put the soap mix in them ... the soap needs a few hours to gel and during that time it gets quite warm (this is the lye working on the oils and making soap ... so make sure the moulds ar on something that won't be damaged by heat. I use a oven rack and have the towels going under the rack, up and over the moulds and tuck in the sides to prevent any draughts. Be careful not to move the moulds, so that the mix moves and sets unbalanced.
Cover the moulds with cling wrap ... before wrapping towels around them. This helps keep the heat in.
I've found the silicon moulds are the easiest to use, as they don't require lining with anything! I like the log silicon mould and have bought a couple on ebay.
I've learned heaps more than this ... and will add more posts like this about essential and/or fragrance oils, colourings etc.
Subscribe to:
Posts (Atom)
LinkWithin
